Method 1: Edit Your wp-config.php File
This method involves adding a few lines of code to a core WordPress file.
Quick Heads-Up: Always back up your website before editing core files. Better safe than sorry!
- Access Your Files: Log in to your hosting account (using cPanel’s File Manager or an FTP client like FileZilla).
- Find the File: Navigate to your site’s main folder (usually
public_html) and locate thewp-config.phpfile. - Add the Code: Right-click to edit the file. Scroll down until you see the line that says:
/* That's all, stop editing! Happy publishing. */. - Paste the following code snippet right before that line:
define( 'WP_MEMORY_LIMIT', '256M' );
@ini_set( 'max_execution_time', '60' );
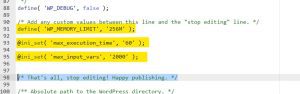
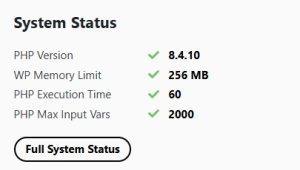
You can adjust the numbers (256, 60, 2000) to match the recommendations in your warning message.
- Save & Close: Save your changes and close the file. Check your WordPress dashboard to see if the warnings have vanished.
Method 2: Use cPanel’s MultiPHP INI Editor (The Easy Way)
If your host uses cPanel, this is the simplest and safest method—no code required.
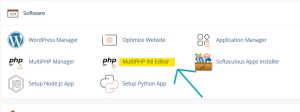
- Log in to cPanel.
- Find the Tool: Under the “Software” section, click on “MultiPHP INI Editor”.
- Select Your Domain from the dropdown menu.
- Update the Values: You’ll see a list of settings. Find and update these three:
memory_limit: Change to 256Mmax_execution_time: Change to 60 (or 120)max_input_vars: Change to 2000 (or 3000)
- Click “Apply” to save your changes.
This usually fixes the problem instantly.
Still Stuck?
If the warnings persist, your hosting provider might have these settings locked. Don’t worry, the solution is simple: contact your host’s support team.
Just send them a quick message asking them to increase the memory_limit, max_execution_time, and max_input_vars for your domain. They can usually handle it in a few minutes.