Look, I get it. Opening the TikTok Ads Manager for the first time feels a lot like walking into the cockpit of an alien spaceship. There are graphs everywhere, acronyms you’ve never heard of, and a looming fear that one wrong click will accidentally spend your entire month’s rent in forty-five minutes.
But here is the truth: if you are running a small business in 2026, you cannot afford to ignore this platform. While Facebook and Instagram costs are creeping up, TikTok is still the “Wild West” where you can get incredible reach for a fraction of the price—if you know what you’re doing.
I wrote this guide because I was tired of seeing “gurus” overcomplicate things. You don’t need a PhD in marketing to run profitable campaigns. In this tutorial, I am going to show you exactly how to set up TikTok ads properly, from creating your account to launching your first creative.
And frankly, the timing couldn’t be better. TikTok is currently aggressive about acquiring new business advertisers, which means they are literally giving away money to get you started (more on that in step one).
So, grab a coffee, close your other tabs, and let’s build this out together.

Step 1: The “Free Money” Hack (Don’t Skip This)
Before we touch the dashboard, we need to set your account up the smart way. Most people just go to the main page and sign up, which is fine, but they usually miss out on the introductory ad credits.
If you are going to test ads, you might as well use their money to do it, right?
Currently, there is a partnership offer where you can claim up to USD $6,000 in ad credit.
Here is how the math works on that offer (it’s a “spend X, get Y” tier system):
- Spend $200, get $200 back in ad credits.
- Spend $500, get $500 back.
- Spend $1000, get $1000 back.
- And it scales all the way up to $4,000 spend for a higher credit tier.
Basically, if you were planning to spend $500 testing your product anyway, using this link effectively doubles your budget. It gives you a safety net. If your first ads flop (which happens!), you have credit to try again without dipping back into your own pocket.
Action Item: Go create your ad account via that link, verify your email, and fill in your business tax info. Once you are verified, meet me back here for step two.
Step 2: Deciphering the Hierarchy
Okay, you are in. The dashboard looks scary, but it’s actually just three layers of boxes. Understanding this hierarchy is the key to learning how to set up TikTok ads without losing your mind.
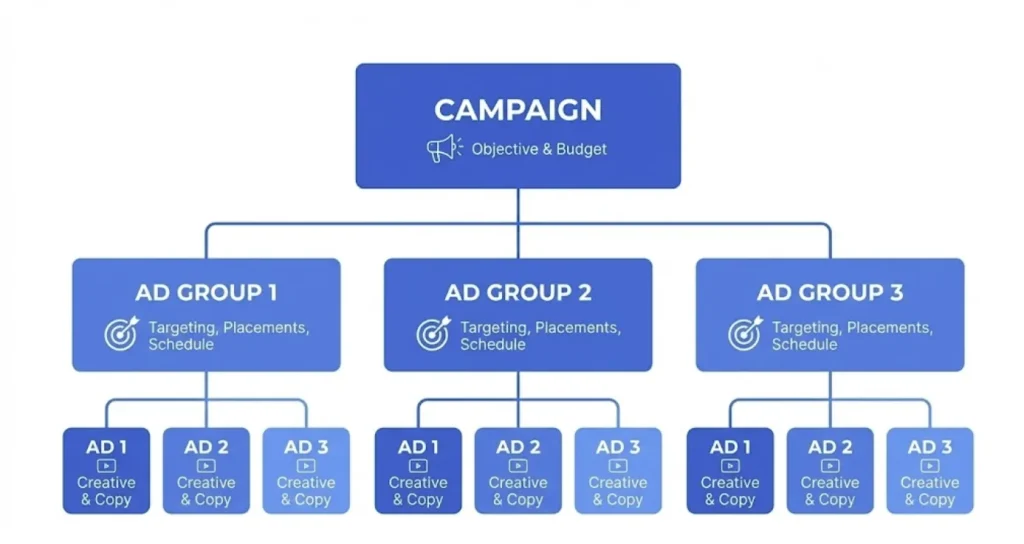
Think of it like a Russian Nesting Doll:
- Campaign (The “Big Idea”): This is the outer shell. Here, you tell TikTok what you want. Sales? Traffic? App installs?
- Ad Group (The “Who & Where”): This sits inside the campaign. This is where you target specific people (moms who love yoga), set your budget, and choose where the ad shows up.
- Ad (The “Creative”): This is the actual video the user sees.
Most beginners mess this up by creating five different Campaigns when they actually need one Campaign with five Ad Groups. Keep it simple. One goal = One Campaign.
Step 3: Configuring the Pixel (The Boring But Necessary Part)
I know, I know. You want to launch the ads now. But if you run ads without a Pixel, you are essentially setting cash on fire in a dark room.
The Pixel is a piece of code that tracks what people do on your website after they click your ad. Did they add to cart? Did they purchase? Did they leave immediately? Without this data, TikTok’s AI cannot optimize to find you more buyers.
- Go to Assets > Events.
- Select Web Events.
- Click Set Up Web Events.
- Choose TikTok Pixel.
If you are using Shopify, WooCommerce, or BigCommerce, you are in luck. You don’t need to touch code. Select “Partner Integration,” log into your store, and it does the work for you.
Pro Tip: Download the “TikTok Pixel Helper” Chrome extension. It’s a free tool that lights up when you visit your site to tell you if the pixel is firing correctly. Never launch a campaign until you see those green checkmarks.
Step 4: Building Your First Campaign
Click the bright pink Create button on the Campaign tab. You will be faced with a “Simplified Mode” vs. “Custom Mode” choice.
Always choose Custom Mode. Simplified mode strips away the controls you need to actually make money.
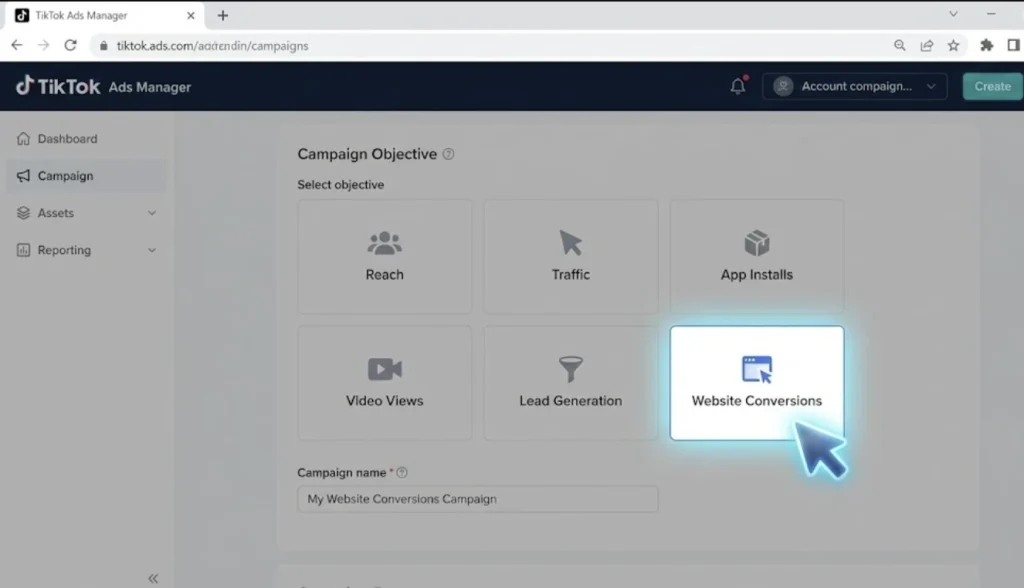
Choosing Your Objective
TikTok will ask: “What is your advertising objective?”
- Traffic: Good if you just want eyeballs on a blog post.
- Community Interaction: Good for getting followers or profile visits.
- Website Conversions: This is the money maker.
If you are selling a product or service, choose Website Conversions. Don’t be tempted by “Traffic” just because the clicks are cheaper. You want buyers, not window shoppers. Cheap traffic that doesn’t convert is actually the most expensive traffic of all.
For the Campaign Name, use a standard naming convention so you can find it later. Something like: Conversions - [Product Name] - Cold Audience - Jan 2026
Step 5: Targeting the Right Audience (The Ad Group)
This is where the magic happens. Or the tragedy, depending on how you set it up.
Placements
TikTok will try to get you to use “Automatic Placement,” which includes Pangle (their audience network of other apps). Uncheck Pangle. For your first campaign, you want your ads to show up on the TikTok “For You” feed, not on some random flashlight app where people click by accident. Select Select Placement and check only TikTok.
Demographics & Interests
This is where 90% of tutorials get it wrong. In 2026, TikTok’s algorithm is smarter than you are.
If you are selling a “Dog Leash,” you might be tempted to target Dog Lovers, Pet Food, Dog Training, Puppies, and Golden Retrievers.
Don’t do that.
When you stack too many specific interests, you choke the algorithm. Instead, go broad. Pick one massive interest like “Pets,” or leave interests completely blank and let your video content do the filtering.
If your video clearly shows a dog leash, TikTok’s AI will analyze the video frames and the audio, figure out it’s for dog owners, and show it to them. Trust the machine.
Budget & Bidding
Set your Daily Budget. The minimum is usually $20/day per Ad Group. For bidding, stick to Lowest Cost (sometimes called Max Delivery). This tells TikTok: “Get me as many results as possible for my $20.”
Step 6: The Creative (Make TikToks, Not Ads)
You have probably heard the mantra: “Don’t Make Ads. Make TikToks.”
It’s a cliché because it’s true. If your creative looks like a polished TV commercial with a generic “Buy Now” banner, users will swipe past it in 0.4 seconds.
Your ad needs to look native to the platform. Here is a simple recipe for a high-converting ad creative:
- The Hook (0-3 seconds): You need a visual or audio interrupter. “Stop doing this!” or “I found the weirdest gadget…”
- The Problem/Agitation: Show the issue your customer faces.
- The Solution: Reveal your product.
- The CTA: Tell them what to do. “Link in bio” or “Shop now to save 50%.”
You don’t need a studio. Filming on your iPhone is actually better because it feels authentic.
Need inspiration? Check out the TikTok Creative Center. It allows you to spy on the top-performing ads in your niche right now. You can see exactly what hooks are working for your competitors.
Step 7: Launch and The “Learning Phase”
Once you upload your video and write a snappy caption (keep it short, hashtags don’t matter much in ads), hit Submit.
Now comes the hardest part: Doing absolutely nothing.
When you launch a new campaign, it enters the “Learning Phase.” TikTok is throwing your ad at different pockets of people to see who bites.
- Day 1: Costs will be high. Performance will be volatile. You will panic.
- Day 2: It might get worse. You will want to turn it off.
- Day 3: The algorithm starts to stabilize.
If you edit your ad, change the budget, or pause it during the first 48 hours, you reset the learning phase. You have to have “diamond hands.” Let it run for at least three days or until it has spent 3x your target cost per acquisition.
Analyzing Your Data
After the dust settles, look at these metrics:
- CTR (Click-Through Rate): If it’s below 1%, your video isn’t interesting enough. You need a new hook.
- CPC (Cost Per Click): If this is high ($1.50+), your audience is too small or too competitive.
- CPA (Cost Per Acquisition): The holy grail. Are you making profit?
Troubleshooting Common Issues
Even if you follow every step on how to set up TikTok ads, things can go wrong. Here are a few quick fixes for common errors I see small business owners make:
“My Ads aren’t spending any money!”
This usually happens if your bid is too low (if you set a manual bid) or if your audience is too narrow. If you targeted “Left-handed dentists in Alaska,” there just aren’t enough people to show the ad to. Broaden that audience.
“I’m getting clicks, but no sales.”
This is rarely a TikTok problem; it’s a website problem. If people are clicking, your ad works. If they land on your site and leave, your pricing might be too high, your site might load slowly, or your checkout process is confusing. Check your landing page speed.
The interface is going to change. Features will move around. But the core principle remains the same: putting the right video in front of the right person.
Don’t let the fear of wasting money stop you. That is literally why I recommended the credit offer in Step 1. Using the TikTok Ad Credit promo gives you a runway to crash a few times before you take off.
You don’t need a viral hit to build a business. You just need a consistent system. And now that you know how to build that system, the only thing left to do is hit record on your camera.
Good luck, and see you on the For You Page.
If you love any tech updates, I have a whole section on tech literacy and reading dashboards over at my Tutorials Category. It is worth checking out if you want to sharpen your general IT skills alongside your marketing chops.